Image Shadow is a dark shape of an image or object. Image shadow creates when a light comes on an image, and it blocks the light source for the different side to create a shadow. For creating a shadow effect, it needs some sources: the sun, light bulb, flashlight, campfire, and so on. On this page, we are discussing how to create a distort shadow in photoshop and features. Furthermore, we are also presented with types of shadow, realistic drop shadow, and how to add blur shade to increase the sell rate of your products. Shadow of pictures is significant for eCommerce sites. It feels realistic when a customer browses any products for buy and especially choosing to add to the cart list, it presents well and looks good. These tutorial steps are a universal tactic for photoshop, if you follow these steps, you can edit your photo any version of Adobe Photoshop, but there is some primarily benefits some update version as like Adobe Photoshop CC 2019 or 2020. These versions have some particular outcomes like output resolution and great RGB colours.
1. 15 Steps to Create Drop Shadow in Adobe Photoshop
We are describing a general method to do drop shadow in any version of Adobe Photoshop. Here we try to show every step manually to create drop shadow effects with shortcut keys. It is common to find out shadow effect image in eCommerce websites, magazine, and many more places to look realistic and attractive for selling the product or publishing something. So, grab your audience with shadow effect image; let’s get started with the tutorial and follow one by one steps.
Shortcuts Key difference between Windows and MAC Users:
Control (Ctrl) ➜ Windows (Win) or Command (CMD) ➜ MAC
Alter (Alt) ➜ Windows (Win) or Option ➜ MAC
1. At first, run Adobe Photoshop software and open your image in Photoshop. For open a clipping path completed image in Photoshop see the screenshot below; go to File>>Open or apply the shortcut key: Ctrl+O (Win) or CMD+O (MAC).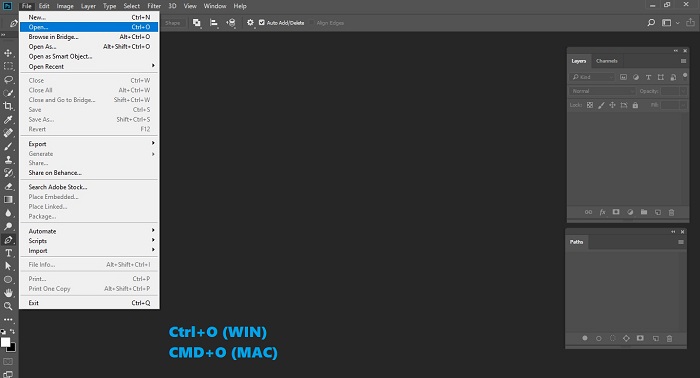 2. Choose your image, then Open it.
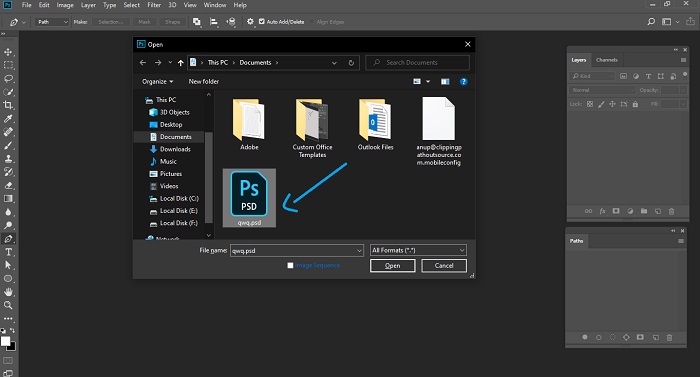 3. Hold the Ctrl key (Win) or CMD key (MAC) and left-click the path thumbnail as you can see the snapshot below for Quick Selection the image. You can also click the Path 1 then hold the Ctrl/CMD (Win/MAC) key hit enter as well for quick selection the path.
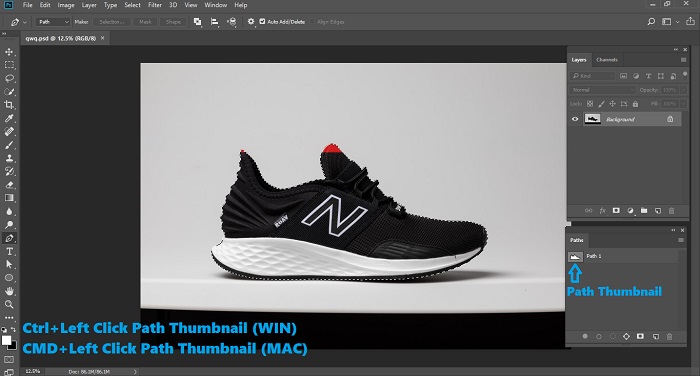 4. For Feather selection; go to: Select >>Modify>>Feather or Shift+F6. To make the shadow realistic, choose the Feather Radius 0.3 pixels, you can also increase the radius number as your desire shadow, but 0.3 is standard for the perfect shadow effect.
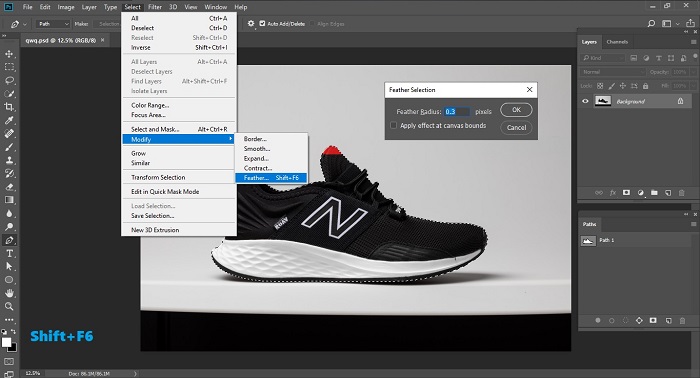 5. Take a New Layer Via Copy which can be used as an active layer into new layer; go to Layer>>New>>Layer Via Copy or Ctrl+J (Win), CMD+J (MAC), where this command copy the selected area as a new layer.
 6. Then deselection the path press Ctrl+D (Win) or CMD+D (MAC), for creating two new layer under the targeted layer (Layer 1) hold the Ctrl/CMD key click create a new layer button.
 7. Remove the background of an image in Layer 3 press Ctrl+Backspace (Win) or CMD+Backspace (MAC).
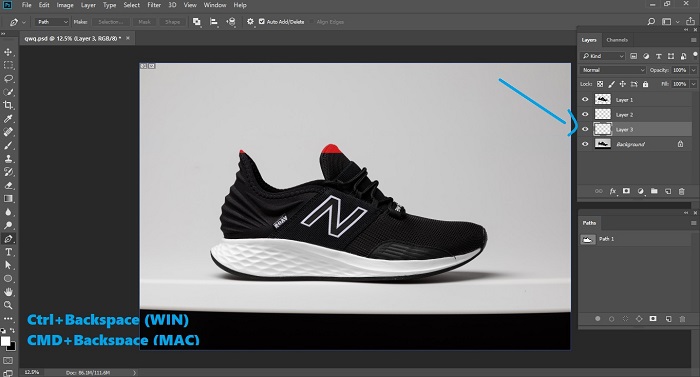 8. Go to the Layer 2>>Ctrl/CMD+Left-click Layer 1 thumbnail then press Ctrl+Backspace (Win) or CMD+Backspace (MAC) for load layer transparency as a selected all object pixels on the layer. Make sure you have chosen background colour black down for Switch Foreground and Background Colour press “X”.
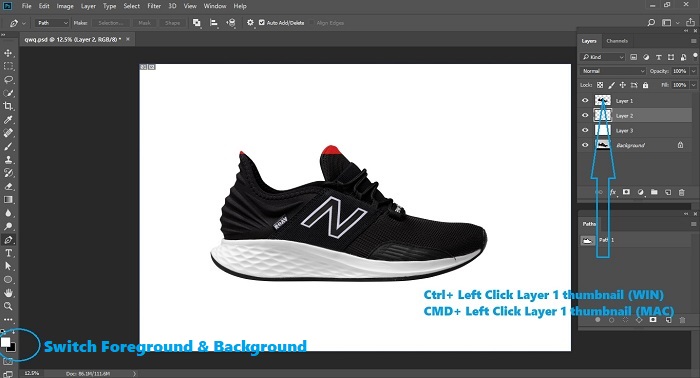 9. Since it is a drop shadow tutorial, the object shadow appears downwards. In Layer 2 the object has to Free Transform downwards. For this go to Edit>>Free Transform or Ctrl+T (Win) or CMD+T (MAC) and move the object with down arrow key (↓) and hit Enter and deselect the path with Ctrl+D (Win) or CMD+D (MAC). You can move with where you need the shadow.
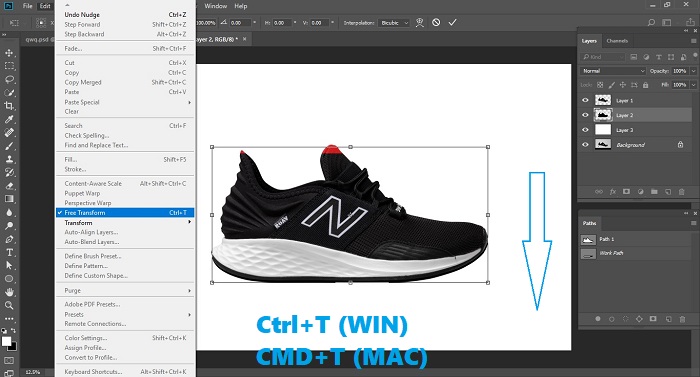 10. Firstly choose the Pen Tool or press “P” for creating a path for the drop shadow. Secondly, quick selection of the path Ctrl+Enter (Win) or CMD+Enter (MAC).
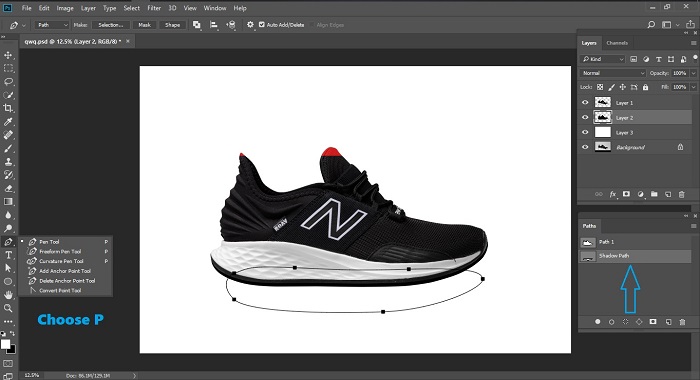
 11. Once again take a New Layer Via Copy; go to Layer>>New>>Layer Via Copy or Ctrl+J (Win), or CMD+J (MAC) and delete the Layer 2 as well jump in Layer 4.
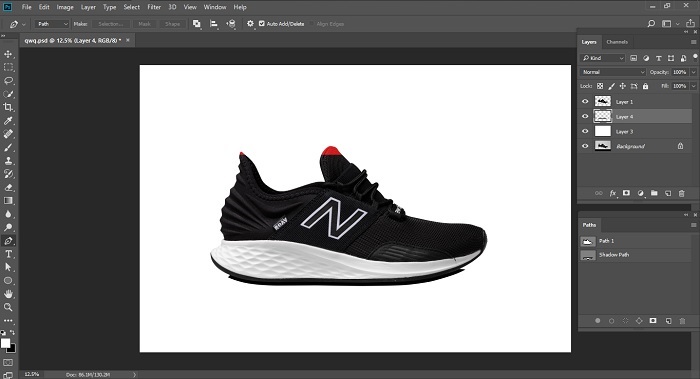 12. The next step is to Blur the shadow where blur means a particular colour transition occurs in an image. In this particular step has to be done in Gaussian blur and makes it Gaussian blurry so that the filter quickly blurs a selection by an adjustable amount. In Layer 4; go to Filter>>Blur>>Gaussian Blur and increase or decrease the Radius with Pixels.
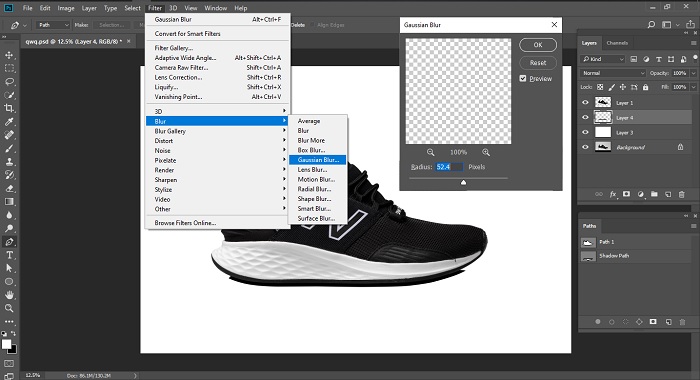 13. After that, make the blurred shadow in the physical view. It is called Motion Blur where blur filters blur in a specific direction (±) 360° and at a certain distance (1-999) to set the blur direction and distance. For that go to Filter>>Blur>>Motion Blur since it is 2D image keep the Distance as your object view.
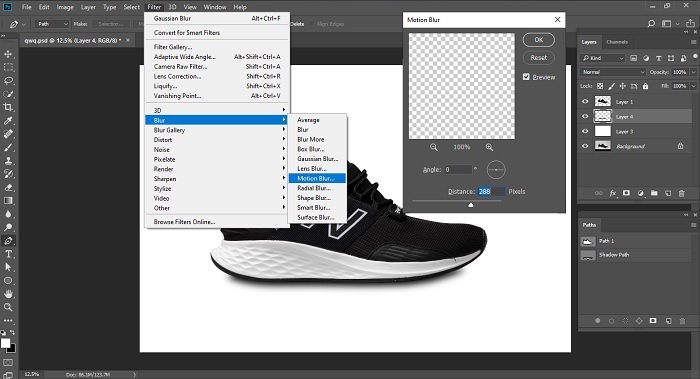 14. Choose the Erase Tool press “E” to remove the extra and blur shadow. Resize the erase tool press the key “[“ or “]”.
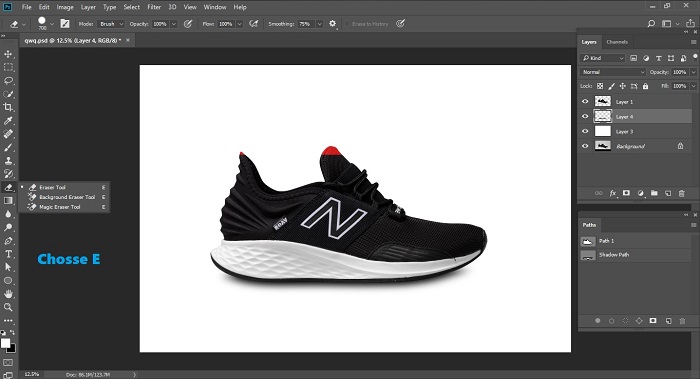 15. After erasing the extra shadow if you think you need to shade more accurately then you can repeat the Gaussian and Motion Blur method and also erasing as well. Before finishing the drop shadow tutorial, you can also set the Opacity according to your needs. Finally “Save” the image in any .format.
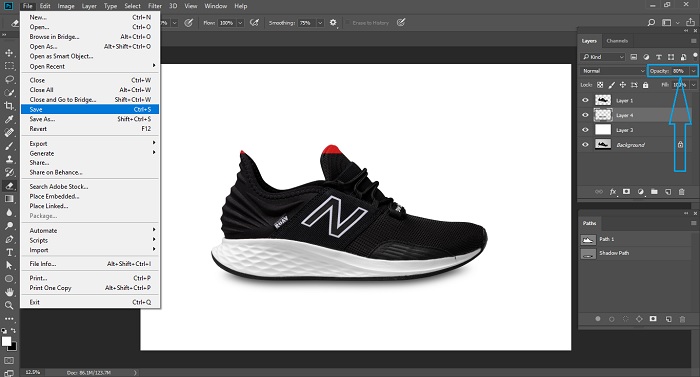

2. Check Out Realistic Drop Shadow Service
We all are fond of magazines, web pages, and advertising pages. We have seen our favourite celebrity pose for a magazine. It just looks perfect! Sometimes we imagine it is the celebrity or the image editing app, which makes us attracted to the image. It's both! The star looks good, and the image editor plays an important role.
If we can see an effect in those images, then it is definitely due to the Drop Shadow. Sometimes the original image we have taken fails to give us a shadow effect.
Let's get deep into knowing the importance of Drop Shadow
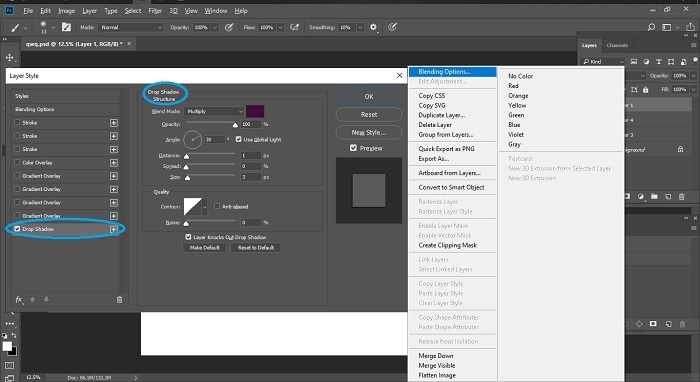
To explain it more easily, I would say that Drop Shadow Service resembles the shadow of a particular object. It adds a realistic look. In the world of graphics, shadow provides a real look to an image and provides a great impression. Go to: Layer 1 Right click>>Blending Option.
It gives rise to the image. Confusing right? If your image looks deeply attached to the background, then drop shadow creates a visualization by uplifting your image.
In Photoshop
If you are a professional who is working with illustration, graphics, logo, catalogue, or you are a web or graphic designer, then your project will look the most stylish with just using the Photoshop drop shadow feature. But before that, you need to add a drop shadow in arrears.
2.1 Let's talk briefly about the features:
1. Dialogue box:
- For the editors, the drop shadow dialogue box is the best place to start.
- This feature gives a summary of other remaining effects and is a primary setting.
- The beginners can start with the feature called a subtle drop shadow, which creates a handy impact.
2. Blend mode:
- The layer which is sitting behind can darken with this feature. It is due to the shadow which blends this mode.
- For starting this task, one can colour this shadow by pressing on the colour block that is in the Blend Mode Drop Menu.
- Impress your audience by adding some additional effects like a tint of shadow colour as the default shadow colour is black.
3. Opacity feature:
- This option is required to decide the density while specifying the shadow.
- To make it more specific, I would say that 0% will be the lightest visible and will not bring any change to your image, and 100% will be the most visible
4. A Light Angle:
- Here, this is the feature that is the most important one. So, let me introduce you to this angle feature that allows you to modify the apparent viewpoint.
- Known as the "Use Global Light," this feature can customize the light source is utilized in other effects just by turning it on or off.
- This feature of drop shadow can also be modified or checked. Uncheck the dialogue box for this operation.
5. Contour:
- Again an essential feature of Photoshop. What is a shape that utilizes a nonlinear fashion?
- Who is an essential term to create limited effects of glow, or when someone selects the various profiles of curves?
6. Size of the shadow:
- If you doubt changing the size of the shadow, then you can do it. Get to know about the size slider.
- It is effortless to use. The size of the shadow differs from the value to put in.
- If your value is Zero, then the shadow size will be the same as your object. The more you increase the size, the shadow size will increase too.
3. How to Add a Drop Shadow in Your Product Image That Makes Good Sales?
For all sellers who want their business to grow will seriously say thanks to the Photoshop world. Drop shadow can add an effect like you will feel that your product is floating on a plain background. Who can create depth for your product by giving a professional touch to your image?
Let’s see how to add a drop shadow in a product image:
- To select the background, click on the Selection Tool.
- For smoothing out your transition, click on the Refine Edge option.
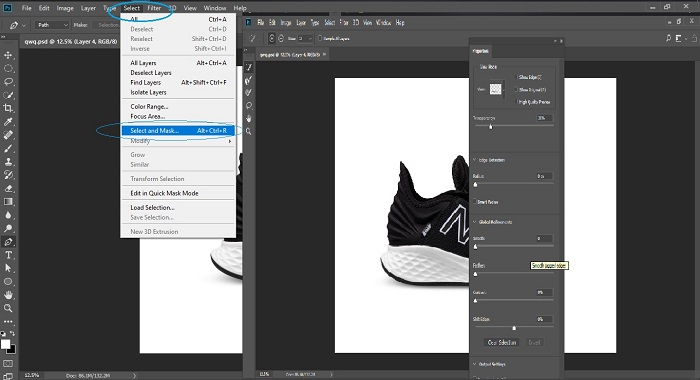
- Move the cursor towards the image, and make a layer mask over the image. Who will remove the picture from the background?
- Now your picture will be removed from the background, then add a new layer, fill it with white. It will come in your environment.
- Mask out all the other things from the background and adjust your picture to the centre and allow room for shadowing.
- With your new mask selection, duplicate your picture layer.
- Then you have to transform the bottom layer of the picture by flipping it vertically. It will make your image look upside down.
- To make it more or less visible, you have to use the gradient tool on this layer mask. You have to keep patience as it may take some while time to find out the right gradient and opacity for the image.
- Remove all the unnecessary objects in the frame, and make sure to use your brush to tweak your mask.
- To make your image look more natural, try brushing and opacity.
- Allow a gentle gradient and refine your selection by feathering it.
- To show a beautiful fall off under your image, brush in some of the sides.
- To give a beautiful shadow look, create a curved layer and darken it well so that it will provide a pleasant shadow look.
- Save your file and flatten your layer.
Remember, to give your image an outstanding look; you must use Photoshop with a professional touch. You can see the real difference when you will have such a steady hand in this. Try to practice more often. If you have practice, then you will not have to wait for anyone else to do this job for you
4. Tips to Add Blur in Drop Shadow
In the world of beautiful people and pictures, we have made new technologies which can make our photos look more attractive. Photoshop is like laser treatment, which can remove every other single spot and make it look more realistic.
Let’s focus on how to add a blur in drop shadow:
Let’s add a Drop Shadow:
Before clicking on the Drop Shadow, open your Photoshop with your image. Go to the main toolbar, click on the option of Layer >> Layer Styles >> Drop Shadow.
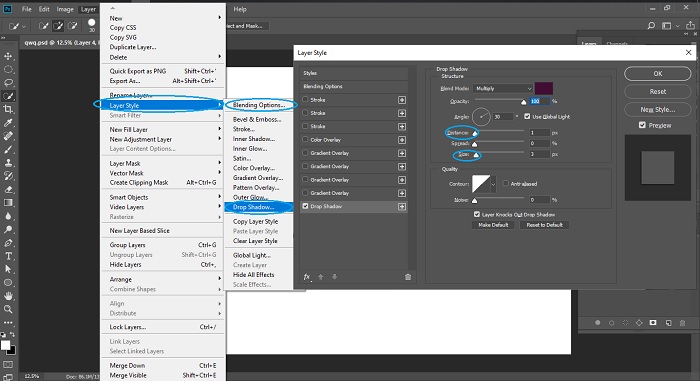
1. Changes in Drop Shadow: When the Drop Shadow menu opens, you have to drag the slider to the left of the Distance value to 0px. It is the lowest value. The distance option is responsible for how far the object’s Shadow will appear. After that, you can find the Shadow poking out from the edges of the image.
2. Blending options: Again click on the Layer option under which you will find the Layer Style. From there, you have to click on the Blending Options. Automatically the Blending options dialogue box will appear.
3. Opacity level: As you have opened the blending options, drag the slider of the Fill Opacity option to the left to 0%. We make it transparent by lowering the fill value, but don’t forget that the Drop shadow layer style should be fully visible.
If you can find the small part of the Shadow is sticking around the edges, then we can fix that too.
4. Open the Drop Shadow menu: Again go back to the Drop Shadow menu. It will switch back to the Drop Shadow menu options.
5. Disable: After opening the Drop Shadow menu, you will find the option called Knock out drop shadow, which is turn on default. Due to its enabling, even if we make the content transparent, you will find the drop shadow remains hidden by the actual contents of the layers. So, you have to disable this option.
7. Size of the shadow: Our layer style option only blurs the image by controlling the size, under the Size option. Size is set to 16px by default. You can add more of a blur effect by increasing the size of the value of the size by dragging to the right side, and to lower, it just does the vice versa.
If you are happy with your blurring, click on the top right corner of the Layer Style dialogue box and click OK and save the file.
If you are happy with your result, then you can save your file. By using it more often, you will learn about the new ideas and techniques which you can opt-in your photoshop design. Here, you learned to handle the blurring of the image. In some pictures, we sincerely want to blur the image, so for that, photoshop can help you out a lot.
5. How to Make Distort Shadow in Photoshop?
You can’t call yourself a perfectionist in Photoshop if you don’t know the Distorted Shadow. Now you can create shadows on your own and make your image look more realistic. These techniques can provide you with a lot of knowledge about Photoshop. Distort darkness has made it easier for the web and graphic designers. You could also be as perfect as the designers if you will practice Photoshop every day.
So there are some easy steps which you can follow to make your own distorted shadow in Photoshop. If you feel like you need to edit the image or want to add the shadow, you can easily do so. You don’t believe me. Now you will.
Step 1: Open your image in which you want to add distorted shadow. Choose whatever shadow settings which you want to use.
Step 2: Open the Layer option, right-click on the fx symbol on your selected layer. Click on “Create Layers."
Step 3: Click on the option Layer-> Drop Shadow layer.
Step 4: Go to the top Toolbar click on Filter->Distort ->Wave as shown in the figure below:

Step 5: Adjust the opacity to your liking, apply the following settings, and click Okay.
Step 6: In the layer, menu clicks on -> Outer Glow. To make the opposite edge more defined, select the move tool, then use the keyboard arrows to nudge that layer.
Step 7: Here, you have to go back and apply measures 2-6 on the elements as desired or on other layers.
You will now get your desired image. With these simple steps, you can distort the shadow in Photoshop. There are other techniques related to drop shadow, realistic shadow. Anybody can learn new methods of Photoshop and become a Pro. There will be no need to depend on anyone after gaining knowledge about it. Now edit, create your world of images.
6. What is a Realistic Cast Shadow?
With the evolution of Photoshop, we can do a lot of creative works. If the picture is missing the Shadow, we can add that too. From these techniques, we could understand how advanced Photoshop has become. So let’s get to work and find what a realistic cast shadow is
Step 1: With the help of the Background eraser tool, you have to remove the background. That can found in the side toolbar? For this, you have to first learn about erasing the history from an image.
Step 2: After removing the background, you have to create a standard Drop Shadow now. Click on the Layer -> Layer Style -> Drop Shadow. To make it look more realistic, you have to choose the colour of the Shadow. By default, it comes black.
Click on the drop shadow dialogue box where you will find a black rectangle box at the right of the blend mode. There you will find the colour picker. You can also change the size to match and to soften other shadows in the image. To apply, click OK.
Step 3: Now you have received a pretty much good drop shadow. Now we want to add a cast shadow. You have to get the Shadow itself on its Layer so now, separate the layer style from the Layer. In the layer option right click on the little “f,” there will appear a drop-down menu. Click on the option of Create Layer.
The Shadow will be moved into its Layer directly underneath the original by splitting into two layers.
Step 4: Now let’s come to the main work of distorting the shape. Click on the EDIT -> Free Transform Tool or press Ctrl/Cmd+T on the selected object, right-click, from there Select -> Distort.
You will find a box with eight little squares. To move the box, you can click in the middle of it. Click and drag the table and fix it according to your picture. Make it as realistic as possible.
Step 5: Click and drag to give it a more realistic look to the image. To apply the transformation, you have to press Return or Enter.
Step 6: Keep in mind that as the Shadow gets away, it has to become softer, and when it appears close to the image, it has to look dark. If your picture seems to be intimate, then press Cmd/Ctrl+J to by dragging the layer into the new layer icon you can create duplicate shadow Layer.
Select the top shadow layer, and then you can turn off the visibility of the bottom shadow layer.
Step 7: To make your Shadow a bit softer, you can add the blur effect. Click on Filter -> Blur -> Gaussian blur. You can add enough blur as required for your image.
Step 8: Now you have to blend two shadows. Click on the Layer -> Layer Mask button then add a layer mask on the top shadow layer. Set the colour to black and white by using the Gradient tool. Select the mask. Drag the Gradient tool for about ¼ way to the bottom of the Shadow. From there, drag it about ¾ of the way up to blend the two shadow layers.
Step 9: At last, set the opacity of the top shadow layer to about 50-75% and bottom Shadow for about 30%. Set the Shadow to the multiply mode. Experiment yourself and learn new ideas of Photoshop. You can see what is right for your image, how to add shadows with so much perfection.
7. How to Use Drop Shadow Layer Style in an Image with Photoshop?
Some of us have always wondered what drop shadow is? If the people who don't know about it, or some of us have heard of it and still don't know about it, then this article is for you guys. You can learn about how to add and use a drop shadow. Let's get to work.
7.1 What is the need for Drop Shadow?
What to give a 3D look to your image? Then it would help if you had Drop Shadow. This feature provides a 3D effect in your 2D picture by adding a shadow behind the photo. By changing the settings of the image, you can easily create a shadow behind the image.
With the drop shadow effect, you can indicate how far the shadow located from the object. It can also show where the light source is coming?
1. The effect of Layer Styles: For the beginners, it is an excellent place to start because you will find the necessary settings. Just looking at it, you can feel how easy it will be to use the drop shadow. A little bit of drop shadow will pick your design up.
2. The effect of Blend Mode: Blend mode helps in the darkening/lightening of the image shadow. It works as its name says, blending style of the shadow. To darken the layer, you have to choose the Linear burn or Multiply.
Here, by clicking the colour block next to the Blend Mode dropdown menu, you can select the colour of your shadow. By default, the colour of the shadow will remain black. You can give a different effect to your shadow by choosing a variety of colours. You can see the figure mentioned below for your reference.
3. Opacity effects: Opacity helps in maintaining the transparency of the shadow. 100% will be completely opaque, and 0% will see entirely through.
4. The Right Angle: Here, the right angle is not for the triangle we made in school, but for the edge from to show the light source coming. It changes the perspective of the light source, which changes the viewpoint from where the light falls. The view angle of the Emboss and Bevel effects changes as the "Use Global Angle" is checked.
5. Distance Effect: The name suggests the role and the feature of the Distance option. It will show the distance between the image and the shadow.
6. Spread effect: Under the distance option, you can find the prospect of Spread. It gives you the harder edges for shadows. You can decrease it up to 0% for softer shades and vice versa for harder shadows.
7. Size effect: Below the Spread option, you will find the Size option. When you put the value to 0px, the shadow and image size will be the same. As you will increase the value, your shadow size will increase.
8. Contour effect: If you want to achieve abstract outcomes or special glow, then contour shapes allow you to choose the shadow to fade out in different ways. You can find a variety of forms under the Contour box.
9. Noise effect: If you want to give your shadow a gritty or sandy feel, then this option is what you are looking for. If you're going to give that look, then increase the Noise value, or keep it in 0%.
10. Knock out drop shadow effect: What could be a little tricky for the beginners? If you allow this option, then it creates a transparency mask on the picture, which does not let the drop shadow to see through. Try out the steps and know more about the drop shadow effect. It will give you more knowledge about it.


