Before doing the clipping path, for one thing, everyone should understand the image edge and, most importantly, what actual part you want to edit? What is the name of editing then must have the basic idea about photo editing software tools such as Pen Tool, Path, Layer, Quick Mask, and so on? Afterwards, to draw a clipping path primarily is used Pen Tool and especially learn how to draw the path of every portion of the image or photo edges. In the end, you can put an image on photo editing software and make a vision of your image how you want it. We provide essential tips and different ways to do clipping paths in various photo editing software like Adobe Photoshop, Photopea, and discussed why it is necessary for the modern age? In this context, we give some fundamental perception about related photo editing, and where it is used, for instance, remove background, image masking services.
This Page
- 1. How to Do Clipping Path Tutorial in Adobe Photoshop
- 2. Magical Ways to Create a Transparent Background of an Image
- 3. How You Can Do a Clipping Path in Photopea?
- 4. Clipping Path and Image Masking Marketplaces?
- 5. What to Choose Clipping Path or We Should Commit to Masks?
- 6. Top Reason Professional Photographers Choose Clipping Path Services
- 7. Top Key Techniques to Remove Background in Photopea?
1. How to Do Clipping Path Tutorial in Adobe Photoshop
Clipping Path Service is necessary when you want to remove photos or images object (e.g. background) and keep the subject of that file for using in another background. Doing clipping path around the subject (e.g. an image) and get rid of the background is not a very complex task for most of the Photoshop experts. But doing the absolute clipping path is a matter of practice of the Pen Tool in Photoshop. So, we say the more you practice Pen Tool, the more you can improve the quality of accuracy on the clipping path task.
This clipping path tutorial will help you to understand the very basic method how to do clipping path in Photoshop (All Photoshop version has almost the same functionality so you can use any of the Photoshop version).
I hope you installed the Photoshop software on your computer. If not then download the Photoshop software and install.
Once the Photoshop software runs successfully, Open the image you want to do Clipping Path.
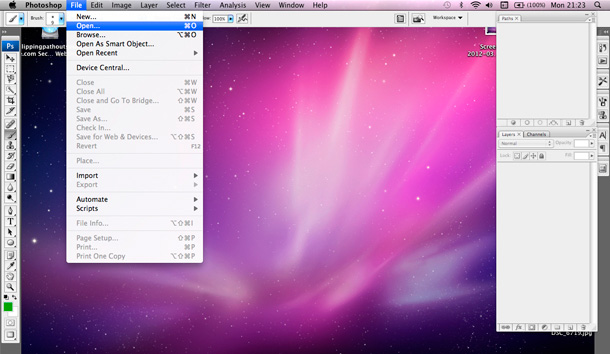
Opening a file is a similar process like other software. Click to file menu and select open. You will get a dialogue box. Now, you have to choose the image you want to open. Alternatively, you can drag and drop the file directly into Photoshop.
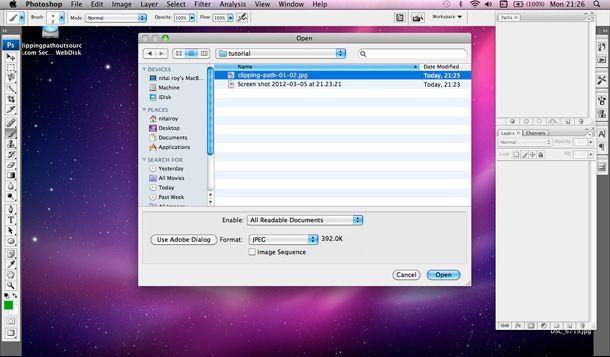
Once you click the open button, the image will open in Photoshop. Loading the file in Photoshop will take a while if your system has less RAM or the file size is higher than 1GB. From our experience, Photoshop CS version requires at least 2GB of RAM so make sure that you have sufficient space before opening a big file. A file may not open in Photoshop or may not save after the clipping path due to the insufficient configuration.
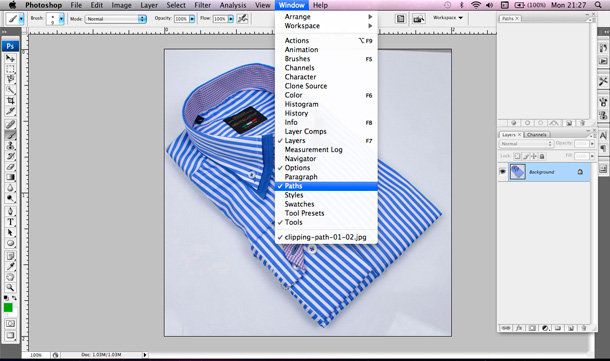
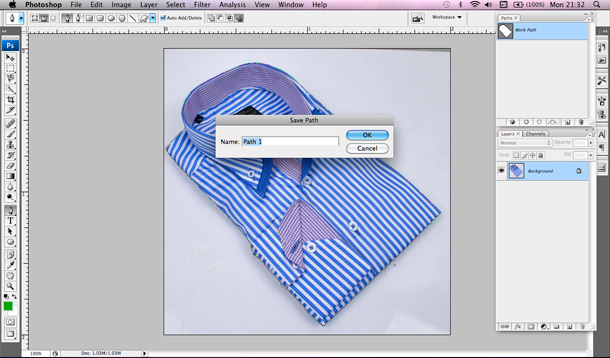
In this tutorial, I have opened a .jpeg file see the below screenshot. Now, go to Window menu to Paths. A Path layer window will pop up. Keep the Path layer window visible on the right-hand side of the monitor so that you can see working clipping path there.
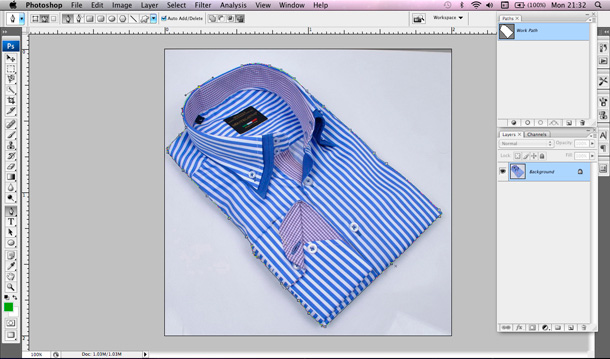
By default, you will see a toolbox on the left-hand side. Or you can select the toolbox from Window menu to Tools. Now you need to click to the Pen Tool from the toolkit. The mouse pointer will look like a pen after selecting the pen tool if not then you have to consider the above Pen Tool selection procedure.
Well, you can draw a path around the edge of the image. An anchor point will be created by clicking on the brink of the picture. From that point, you click another adjacent edge and keep drawing till path image arises to the initial point and join it.
Now select the Path layers window and make the working path to clipping path. Here you need to double click on the Path layer then a small window appears as Save Path and name Path 1. Finally, click the ok button and save it as Path 1. You can change the pathname and use your desired clipping pathname.
Or watch the video tutorial. We provide clipping path service if you need then Contact Us.
Best of luck with our basic Photoshop Clipping tutorial.
2. Magical Ways to Create a Transparent Background of an Image
Everyone doesn't need to know how to edit an image. Everyone has a different business background. Nobody is perfect, and some don't even have time to write the images in this busy schedule. If you ask a professional to edit a picture, then get ready to pay them unless or until they are known to you. But still, nowadays, it is essential to see the editing of pictures.
There are lots and lots of image editing tools that can create magic in your picture. So, if you are facing problems in one app, then don't worry, you have multiple other apps that can push your editing skills to a higher level.
2.1. Magical ways through Fotophire Editing Toolkit:
There are a lot of features in Fotophire, which makes it among the top list of photo editing apps. To create a transparent background or to replace the existing knowledge of your image, you have to click on the "Photo Cutter" feature.
Click the "Open" button and take out the image in which you want to take action. For the further process, click on the "Paint Areas to Remove" tool. With this tool, you can easily mark the areas where you want to create transparency. After completing the editing, do click on the save button.
2.2. Magical ways through Photoshop:
One of the most popular apps in word wide is, resize, crop, or to add effects is this one. Yes, you heard it right. It's Photoshop! First and foremost, an option to choose the image you want to edit then click on the "Lasso Tool" or "Magic wand Tool" or "Quick Selection Tool." Now take the cursor to those areas where you want to create transparency.
For a more fine-tuned image, you have to minimize the brush size and zoom into your vision. Now to the remaining background, you need to click on the keyboard: "Shift+Control+I." To view, click on the "Refine Edge" then click on the "Smart Radius" to give a more realistic and smooth look.
If you want to remove extra colours, fringes click on the "Decontaminate colours." Then you have to tap on the "Output section" -> "New Layer with Layer Mask" option. Lastly, don't forget to save the file in PNG format.
2.3. Magical ways through Mac:
Mac users have a fantastic way of user experience. We all know that working in a Mac is as smooth as butter. And for Mac users, one thing is common, and that is the "Preview" tool. Mac users can read this one if they are looking for more features, and non-mac users can gain as much knowledge as they want.
If you are a Mac user, then you should not wait for a second to open the Preview software. This software will provide you with fantastic transparency or background removal editing techniques that you can apply to your image.
First of all, select your image you want to edit and open it through the "Open with an option" and then click on the "Preview." Now click on the "Markup toolbar" for creating background transparency in your image. Tap on the "Show Markup Toolbar," then click on the -> "Instant Alpha Option."
With the help of the "Marching ants" line, you can markup your selection to create transparency. After that, you have to Delete the chosen area. From there, click on the save button and convert it into a PNG format.
3. How You Can Do a Clipping Path in Photopea?
Many of us don't know about the clipping path in Photopea (All functions are common like Adobe Photoshop). The main job of the clipping path is to define which part of the image would be transparent and which part of being visible.
If you want an object to be a silhouette, then we create a path around there. So here comes the steps through which you can create a clipping path.
Steps:
- Open the image that you want to edit. From there in the side toolbar, you can find the option of Pen Tool. With the help of a pen tool, you can create a path around the image that will become a silhouette.
- Now the path panel has opened. In that panel menu you have a Save option, click on it. Edit the path with your desired name.
Note: If you are facing problem to find the save option then no worries, your path has been protected automatically.
- Now you have to choose the clipping path from the same panel menu.
- Now from the drop-down list, you have to select the path from the clipping path dialogue box.
- Click OK, if it is not already selected.
- After that, choose the File then from the drop-down list click -> Save as.
- From the EPS dialogue box, click on the Photopea/Photoshop EPS.
- Accept the defaults and click OK, in the EPS dialogue box that appears.
You don't need to save the File in EPS, if you are placing the designs in other Adobe applications, like InDesign. Just leave it as (.PSD) Photopea file.
Using in other adobe applications in InDesign or Illustrator
- When you are creating a clipping path, create a way around the item you want to keep.
- Click twice on Add layer Mask Button, in the layers panel.
- Everything outside the path becomes transparent as a layer vector mask created.
Note: By using the Direct Selection Tool, you can still edit the path.
- Click on Save and save it in the.PSD format.
- To put into the Adobe Applications with its clipping paths included, you have to choose File.
With the easy steps, you can create your clipping path. It takes time to learn new things and to be a perfectionist. It is way better to do on your own rather than depend on anyone else. Photopea has made editing work so much easier for many people. From web designers to photographers, all have used to work in photopea, as it is easy to understand.
4. Clipping Path and Image Masking Marketplaces?
With amazing software like Photoshop, Pixlr, Photoscape X, GIMP, life has become much more comfortable. Reason: amazing editing features of this software. Clipping Path and Image Masking are different names with the same features.
Both provide unique editing techniques, but the difference between both is that in which you isolate the subject.
4.1. Clipping Path:
- To explain the clipping path in an easy way to describe it as a background removal tool with the use of Pen Tool in Photoshop.
- When the subject of an image has smooth, sharp edges, then the clipping path is used in these cases.
- The clipping path should be drawn straight so that your image will look natural and real. If you bring poorly, it can result in the opposite.
- Take your time to draw if you are working on e-commerce websites; then, you should know how to use the Clipping path in near perfection.
4.2. Image Masking:
- Image masking could also be called a technique used to remove the background of an image.
- In Photoshop, Image Masking is done through a variety of tools of Photoshop like Magic Eraser Tool, Colour Separation Technique, and Background Eraser Tool.
- When your image has lots of fine-lines or small details, then you have opted for the right tool. If we talk about fine lines or little information, it could be of hairs, fur or any animal, or any sweater.
- You need image masking techniques if you are doing the complex editing with background colours or shadows.
4.3. Image Masking Vs. Clipping Path:
The main difference between the Clipping Path and Image Masking is that the technique used to remove the background. For easy tasks, we need a Clipping Path, and for complex ones like fur, hair, we need Image Masking.
See, we can remove the complex background from the Clipping Path, but results are not as good as you can imagine. The compound image edited through Clipping Path looks very unreal.
- Clipping path helps in altering several objects, while image masking only focuses on one purpose.
- In Image Masking, an individual is the only edit, and in the clipping path, we can focus on a group of objects.
- A Clipping path can remove the background by colour or erase it, but image masking creates transparency by adding layers.
- Just remember that if we need to do the intricate image like to do multiple edits, changing the background with shadows, then we need the image masking.
There are five types of Mask in Photoshop, like Quick Mask, Clipping Mask, Layer Mask, Vector Mask, Adjustment Layer Mask. You can choose a mask according to your needs, like in which image you should use.
For e-commerce websites, we need Photoshop techniques. And in my personal view, I don’t like to depend on anyone on anything. If we can learn how to change the background or remove the experience on our own, then we don’t need to depend on anyone. So having a good knowledge of these two techniques is a great step towards editing the pictures yourself without seeking help.
5. What to Choose Clipping Path or We Should Commit to Masks?
We humans have one thing in common. We get too attached to something, whether it is about people, problems, or even technologies. Sometimes the worst part is to forget about the old technologies or breaking some past long-term relationships. Indirectly I am saying there is no benefit in staying on anything if it is not making you a better person. Some will be finding it too hard to understand and come to the technologies we have to upgrade. Yes, it is true if we want to walk step by step with our generation, then we should know how to use advanced technologies.
Let's discuss the issues we have to face while using the clipping path:
Not at all transparency: Yes! The main reason for not choosing a clipping path is due to the lack of advancement. In the clipping path, you can change the background by removing it. But you can't create transparency.
Hard edges everywhere: If you have experience of working in both photo masking and clipping paths, then I am sure you know what I am pointing at. In the clipping path, we can quickly notice the remaining hard edges. But when it comes to image masking, transparency can make your image/photo look more real.
Perfect cutting of images: While cutting the edges of the photos, you cannot get the perfection in the clipping path. But in image or photo masking, the techniques are more advanced so that you can change the fine little line, which can't be seen through the naked eye.
5.1. Why choose Image Masking?
Image Masking has the benefits of cutting the unwanted edges with perfection with its perfect tools, adjustable pixels to create soft background and tips, is suitable for the web as it works with prints.
Nowadays, we need perfection in the field of photo editing skills. It is not the 80's or 90's era, where photography or web or graphic designing didn't exist. It is the 21st century which requires new advanced technology. With image masking service, we can get more enhanced images as compared to the clipping path.
If we are editing the images of any group, like people or anything, then the clipping path can be used. But if we need to adjust the background of a model or any furry or stuffed animal, then we should opt for photoshop masking because it focuses on the fine-lines.
As you can see a clear difference, advanced technologies are needed for our generation. As different techniques are coming up, the old techniques are going backwards. As days are passing by, the new generation is getting more and more attracted to the latest technologies, like photo masking. The results are evident as we have compared them. At last, it clearly shows that the multiple complex tasks are accomplished through the image masking services. Clipping path doesn't support this perfect technique. For small changes we can opt for the clipping path, but not for the big tasks. Don't get worried about learning new methods of photoshop masking tutorials if you have only topped in the clipping path. Trust me; it is worth learning.
6. Top Reason Professional Photographers Choose Clipping Path Services
You can recall the most beautiful thing about this world is photography. It has changed the perspective of people. For many photographers, web, or Graphic Designers, Photoshop is a blessing. It enhances all the small details which are need in a photo. It makes the picture near to perfect.
With the help of transparency layers, you can add or remove any effect. Before coming to the details, we have to first focus on
What is Clipping Path?
Clipping Path explains as a technique through which we can edit our photos using pixels. Clipping path focuses on removing the background of the images. Clipping path could be mentioned as an incredibly powerful tool when used in different layers by digital artists or designers.
First, you have to open the layer palette, choose the layer in which you want to work, to create a clipping path service. The pixels which unselected will set to transparent; the selected ones will be set to visible if you make the current selection. In direct relation to the degree of choice, the chosen partial pixels seen as transparent.
6.1. Pros & Cons of Clipping Path
If you thought that clipping paths only have advantages, then you are wrong.
Pros:
- The main advantage of the clipping path is it can use with texts. It mainly allows you to use a text layer as a mask without converting it into ways (vector masks) or to rasterize the text (layer mask).
- A vector mask, a clipping path, can only be plotted, and an elaborate cover can only be a grayscale image.
Cons:
- The main disadvantage would be that it was formed by at least two layers, which are uncomfortable to handle, like the most trimming faces. Who can solve by bringing them in groups and by linking and unlinking layers?
- Groups can not be a mask as the valid groups of layers: there are vector masks and layers.
The first step towards every photo editing is the CLIPPING PATH SERVICES. If you are mainly from e-commerce or a designing background, you need to follow the clipping path. Without this, you cannot get clear or remove the background from your product’s image. Who could name as the root sector of managing any editing of a picture? If we speak in general, then we remove the background from an image, with the help of the fantastic services of the clipping path.
7. Top Key Techniques to Remove Background From in Photopea?
We all know how we get one best picture in a hundred images taken. It is not an easy task to make an image whose background and first image both look perfect. But sometimes, we don't get what we want. If we get a better front image, but then again, we get a blurred background, then what's the point in that picture.
Now in this world full of photoshop designers, it is effortless to get the desired image. Suddenly, you don't have Adobe Photoshop CC don't worry, Just upload your image in Photopea and boom! You are ready to start.
Let's put some light on the steps which will make you believe in the magic of photopea:
Get, Set, Go!
- First of all, before you get started, open your image in Photopea! Now click on the Quick Selection Tool, which you can easily find from the side Toolbar.
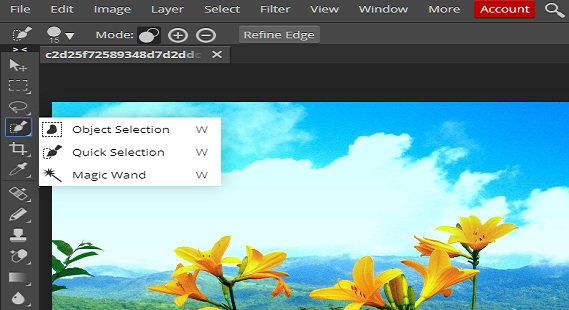
- If you are not able to find it, then you can find it under the Magic Wand Tool.
- At the top of your workspace, you can find the context-sensitive menu while choosing the Quick Selection Tool.
- Before beginning, don't forget to click on "Add a Selection." Depending upon your photo, you need to open the "Brush Picker" to reduce or increase the brush size.
Removing time:
- Now comes the critical part where you need to focus. Click and drag your mouse on the unwanted background.
- You will now be able to see dotted lines or a group of ants marching. Here you can make your selection grow by just adding clicking and dragging.
- While selecting the area, sometimes we mistakenly choose the unwanted area. To remove this, you have to press the 'Alt' or option key and drag it towards the locality where you want to remove the background.
- For complete removal, zoom-in for the stricter areas like for subject or the background.
Improve the Edges:
- Right-click on the "Refine Edge" after completing the selection. For better results, the Refine Edge tool is the best.
- Change the option which sharply contracts with your selection, or change "View Mode" to "On White."
- To soften the edges of your image, you can increase the Smooth value slider to soften your edges.
- Smoothing will help you the most. Lastly, click, OK.
Now check your results:
- The primary step is to review your results. Now, within your selection, choose Layer via Copy by Right Clicking.
- Automatically, your edited copy will assign itself to a new layer.
- Now to view your completed masterpiece, you have to toggle off the visibility layer of your original background image.
- In the end, your image is ready to join the new background based on your creativity.
Anyone can use it with just following the steps. Try out these techniques and create your masterpiece in Photopea. Who will surely help you out! You need not be a web designer or graphic designer to be specialized in Photopea.


